
# 1.cmd
1. 命令行窗口 (小黑屏)、CMD 窗口、终端、shell - 开始菜单 --> 运行 --> CMD --> 回车
- 常用的指令:
dir 列出当前目录下的所有文件
cd 目录名 进入到指定的目录
md 目录名 创建一个文件夹
rd 目录名 删除一个文件夹
- 目录 | |
. 表示当前目录 | |
.. 表示上一级目录 | |
- 环境变量(windows系统中变量) | |
path | |
C:\work\jdk\jdk1.7.0_75/bin; | |
%CATALINA_HOME%/bin; | |
C:\work\soft\tools\AppServ\Apache24\bin; | |
C:\work\soft\tools\AppServ\php5; | |
C:\Users\lilichao\AppData\Local\Programs\Fiddler; | |
C:\work\environment\Egret\Egret Wing 3\bin; | |
C:\Users\lilichao\AppDataoaming\npm; | |
C:\Program Files\MongoDB\Server\3.2\bin; | |
C:\Users\lilichao\Desktop\hello | |
- 当我们在命令行窗口打开一个文件,或调用一个程序时, | |
系统会首先在当前目录下寻找文件程序,如果找到了则直接打开 | |
如果没有找到则会依次到环境变量path的路径中寻找,直到找到为止 | |
如果没找到则报错 | |
- 所以我们可以将一些经常需要访问的程序和文件的路径添加到path中, | |
这样我们就可以在任意位置来访问这些文件和程序了 |
I/O (Input/Output)
- I/O 操作指的是对磁盘的读写操作
Node
- Node 是对 ES 标准一个实现,Node 也是一个 JS 引擎
- 通过 Node 可以使 js 代码在服务器端执行
- Node 仅仅对 ES 标准进行了实现,所以在 Node 中不包含 DOM 和 BOM
- Node 中可以使用所有的内建对象
String Number Boolean Math Date RegExp Function Object Array
而 BOM 和 DOM 都不能使用
但是可以使用 console 也可以使用定时器(setTimeout () setInterval ())
- Node可以在后台来编写服务器 | |
Node编写服务器都是单线程的服务器 | |
- 进程 | |
- 进程就是一个一个的工作计划(工厂中的车间) | |
- 线程 | |
- 线程是计算机最小的运算单位(工厂中的工人) | |
线程是干活的 | |
- 传统的服务器都是多线程的 | |
- 每进来一个请求,就创建一个线程去处理请求 | |
- Node的服务器单线程的 | |
- Node处理请求时是单线程,但是在后台拥有一个I/O线程池 |
# 2.Node
# 1. 给 Node 传参
我们都知道,node 中有一个全局对象叫做作 process 对象
node index.js Nirvana age=18 |
我们其实会发现我们所传递的参数,都会存在 node 中的 argv 数组中。
argv:[ | |
"node":node的系统路径, | |
"index.js":运行javascri文件的路径 | |
...[参数 | |
e.g: | |
"Nirvana", | |
"age=18" | |
] |
当我们需要去访问传递的参数时我们可以
process.argv[2]; | |
process.argv[3]; | |
你也可以: | |
process.argv.foreach() |
# 2.Node 程序的输出
# console.log
最常用的输出内容的方式
# console.clear
清空控制台
# console.trace
打印执行栈
# 3. 常见的全局对象
首先我们先了解一些特殊的全局对象
为什么叫做全局对象呢?
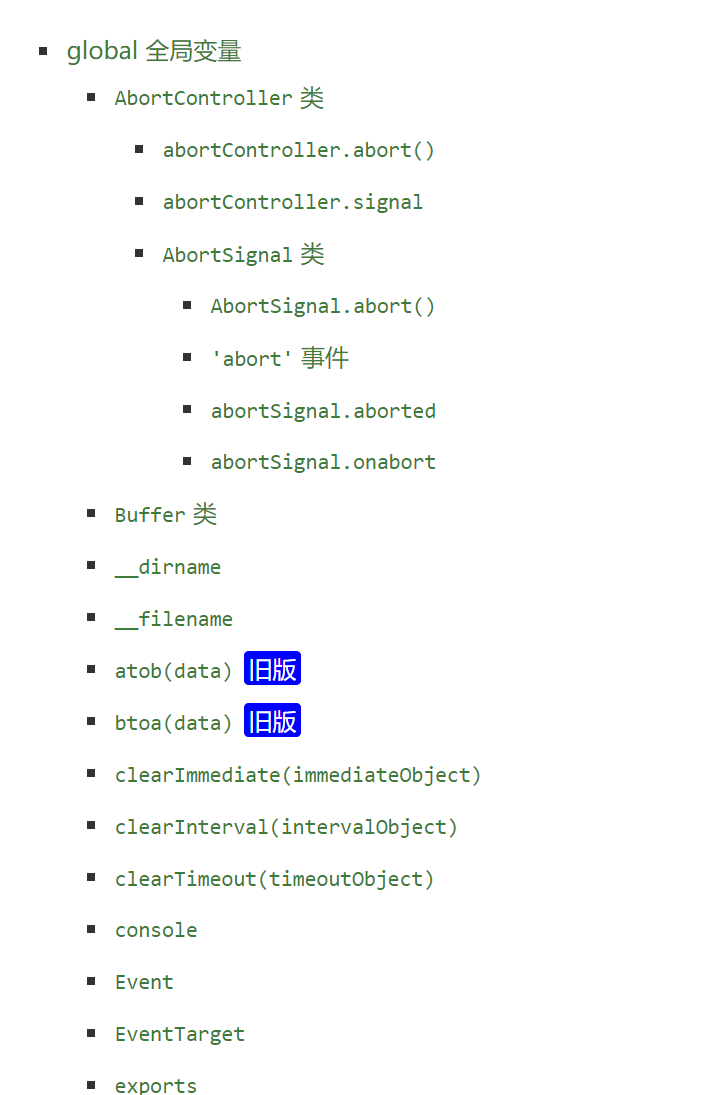

● 这些全局对象实际上是模块中的变量,只是每个模块都有,看起来像全局变量 | |
● 在命令行交互中是不可以使用的 | |
● 包括:_dirname,_filename,exports,module,require() |
process 对象:process 提供了 Node 进程中相关的信息
console 对象:提供简单的控制台调试
定时器函数:在 Node 中使用定时器的方式有好多种
global 对象
global 是一个全局对象,事实上前端我们提到的 process,console,setTimeout 等都要放在其中

他其实就跟我们的 window 对象很像,但也有区别
var name ="Nirvana" | |
console.log(name)//Nirvana | |
console.log(global.name)//undefined | |
因为在浏览器中,是没有模块的概念,但是在node中会有模块化的思想,每一个文件都是一个模块,他不会轻易将变量放在global上面的 |
# 4.JavaScript 的模块化
# 1. 什么是模块化
事实上模块化开发最终的目的是将程序划分成一个个小的结构
这个结构中编写属于自己的逻辑代码,有自己的作用域,不会影响到其他的结构
这个结构也可以将自己希望暴露的变量,函数,对象等导出给其他结构使用
也可以导入
# 2.CommonJS
Node 应用由模块组成,采用 CommonJS 模块规范。每个文件就是一个模块,有自己的作用域。在一个文件里面定义的变量、函数、类,都是私有的,对其他文件不可见。在服务器端,模块的加载是运行时同步加载的;在浏览器端,模块需要提前编译打包处理。
# 1. 特点
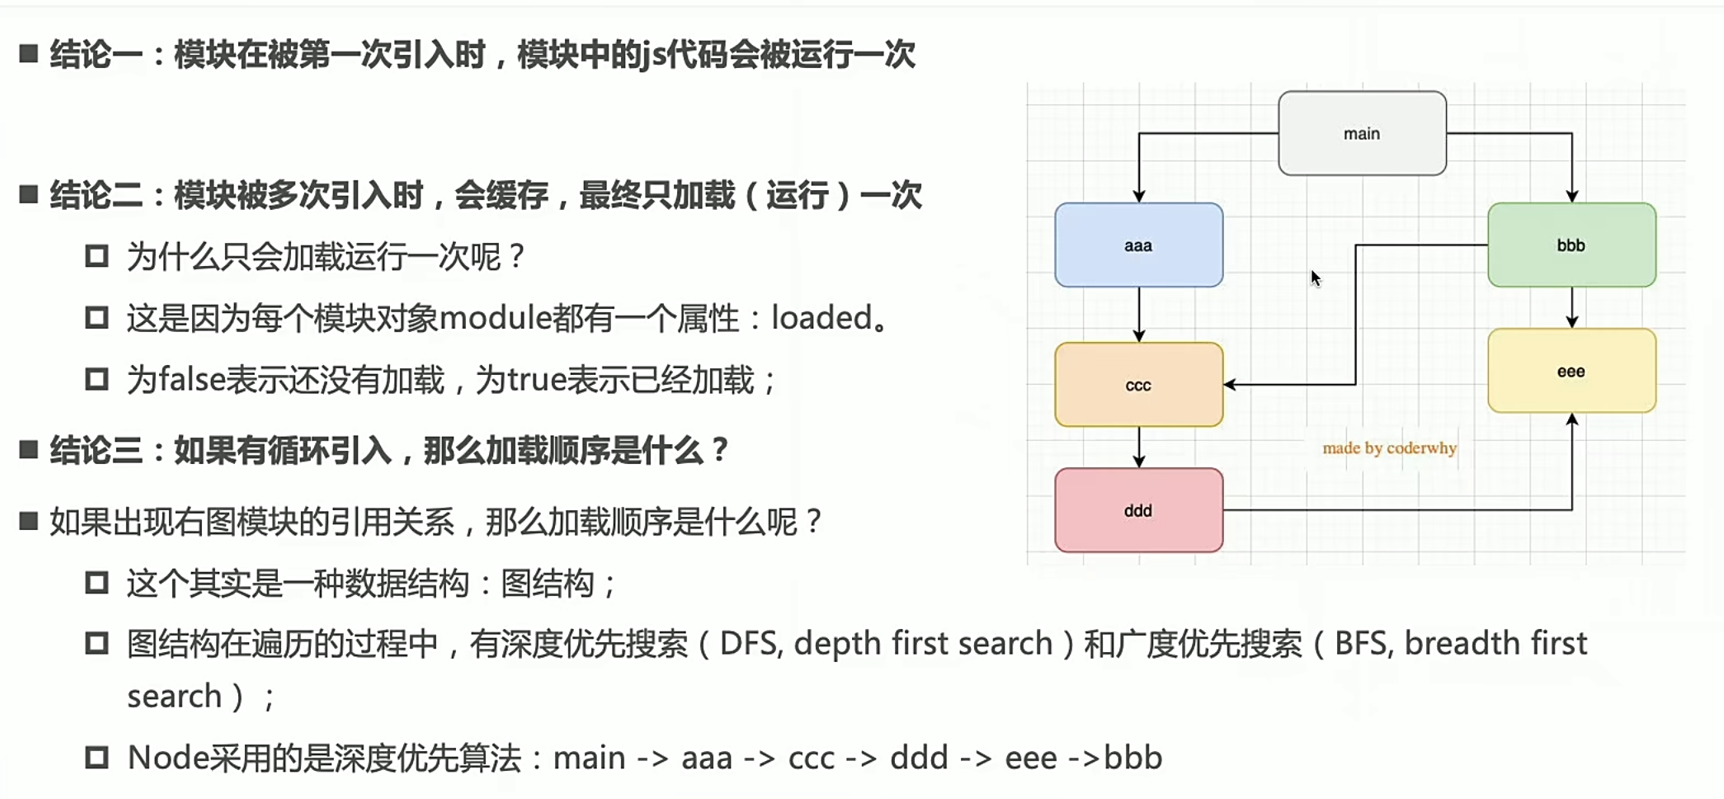
所有代码都运行在模块作用域,不会污染全局作用域。
模块可以多次加载,但是只会在第一次加载时运行一次,然后运行结果就被缓存,以后再加载,就直接读取缓存结果。要想让模块再次运行,必须清除缓存。
模块加载的顺序,按照其在代码中出现的顺序。
CommonJS 模块就是对象
运行时加载
# 2. 基本语法
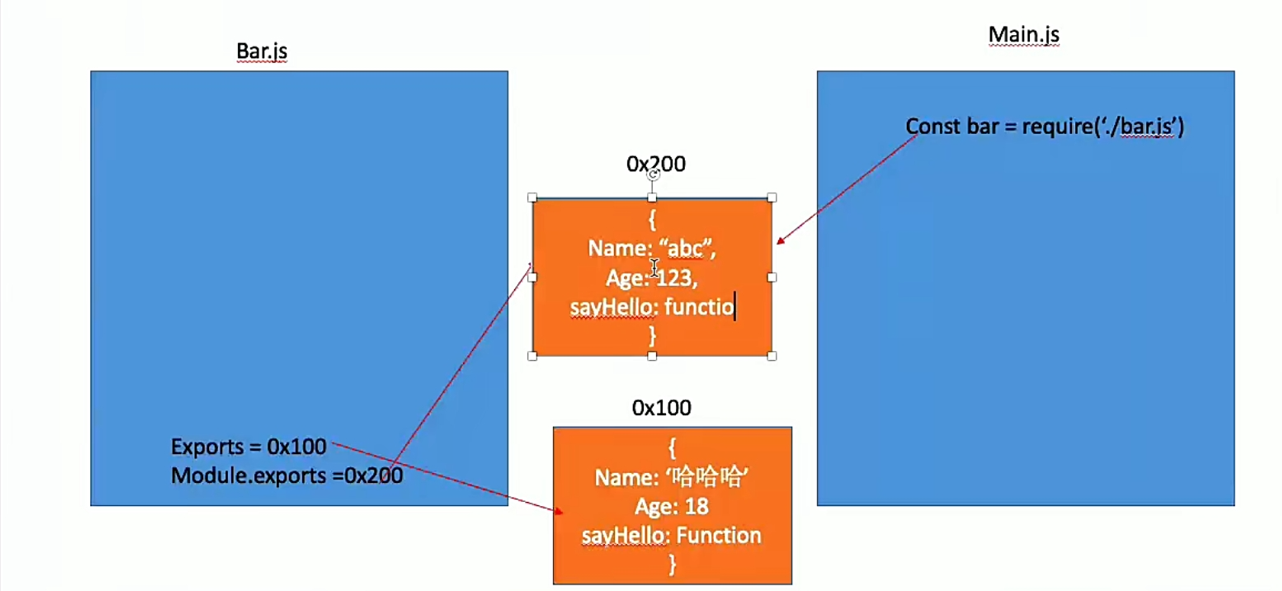
// 暴露方式 | |
module.exports = value; | |
exports.xxx = value; | |
// 导入方式 | |
const value = require('./test.js');// 自定义模块就是路径,第三方模块就是名称 |
# 3. require 细节
- require 的加载过程是同步的
- 当模块被多次引入时,模块会进行缓存,最后只执行一次


require 的加载过程
# 5.Path 模块
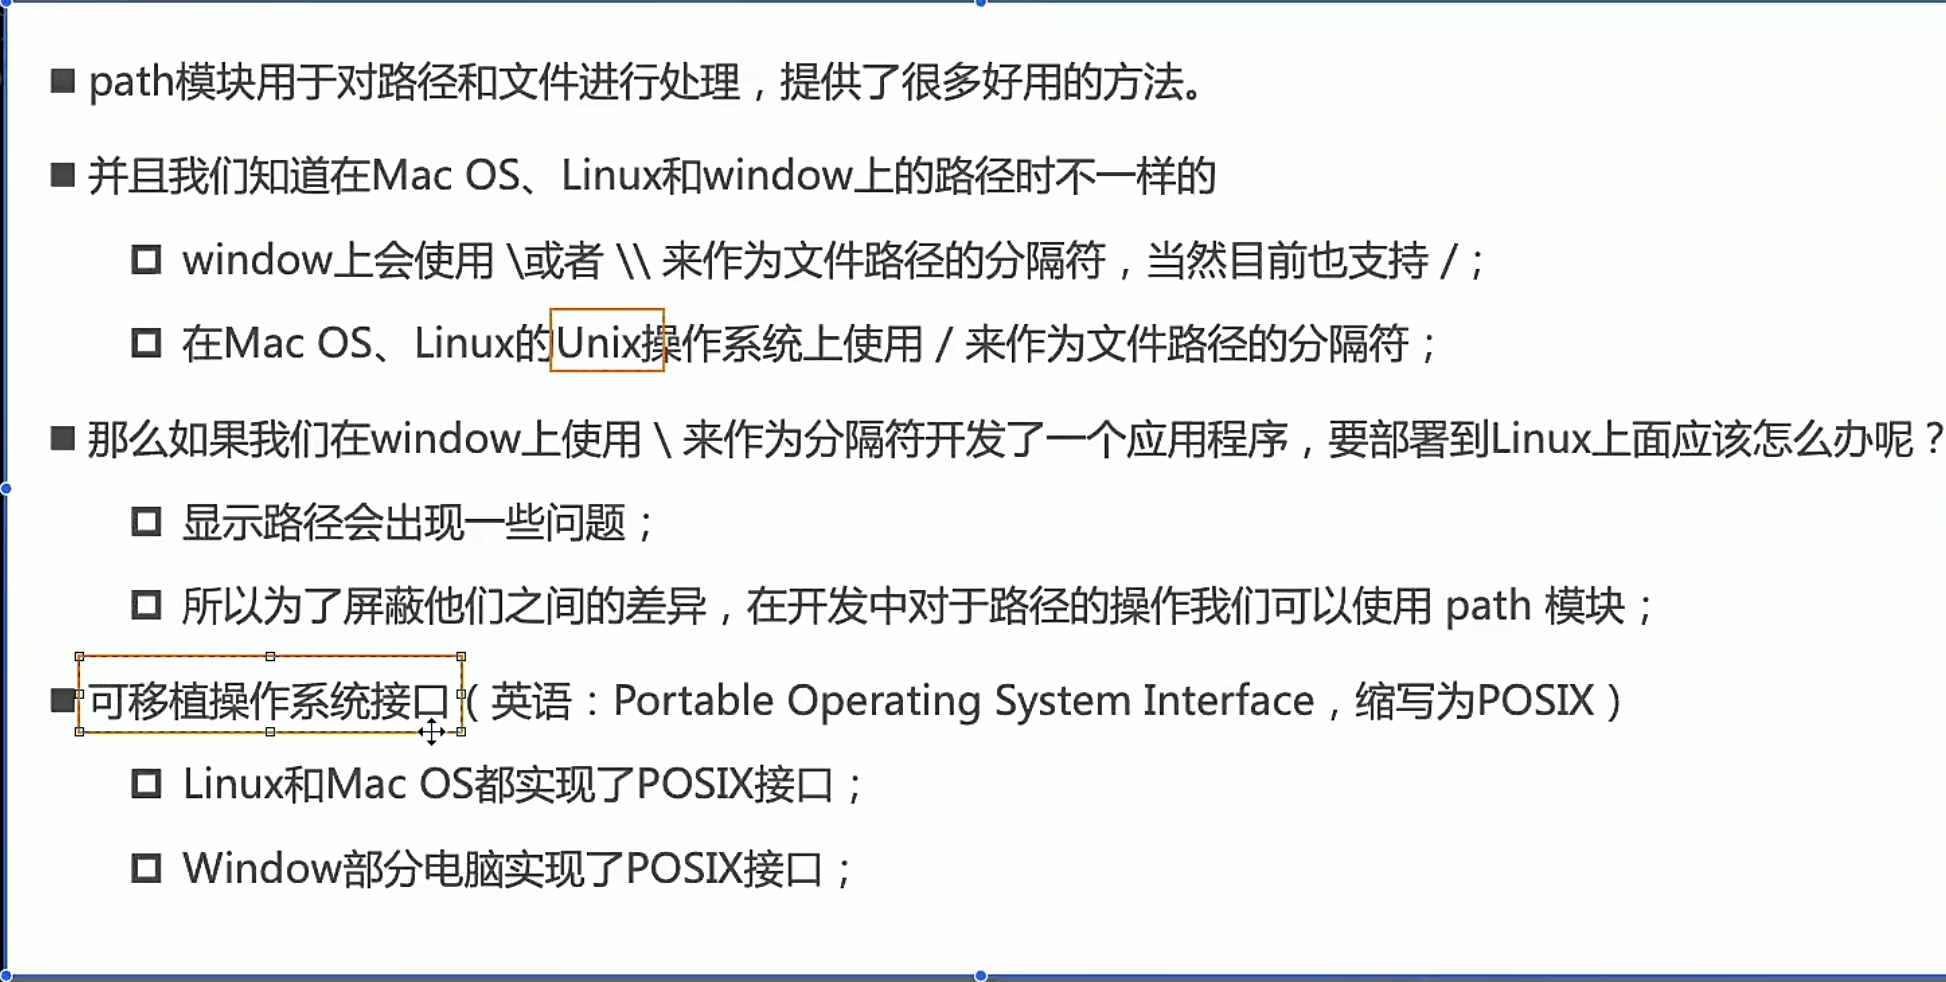
基础 api 可以查看 http://nodejs.cn/api/path.html
主要注意的是 path.join 和 path.resolve 的区别!!!!
# 6.fs 模块
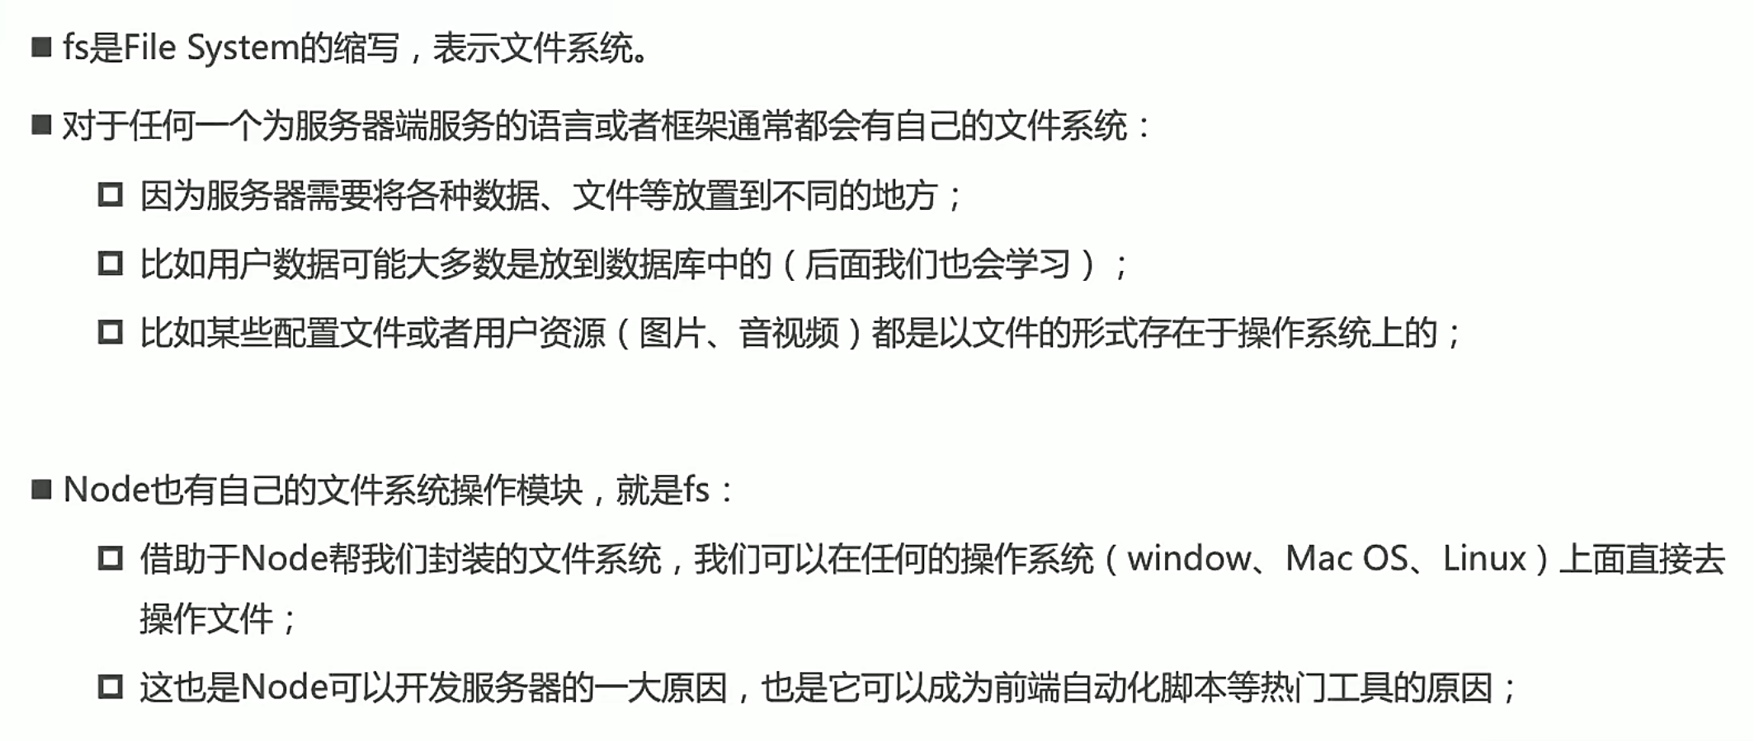
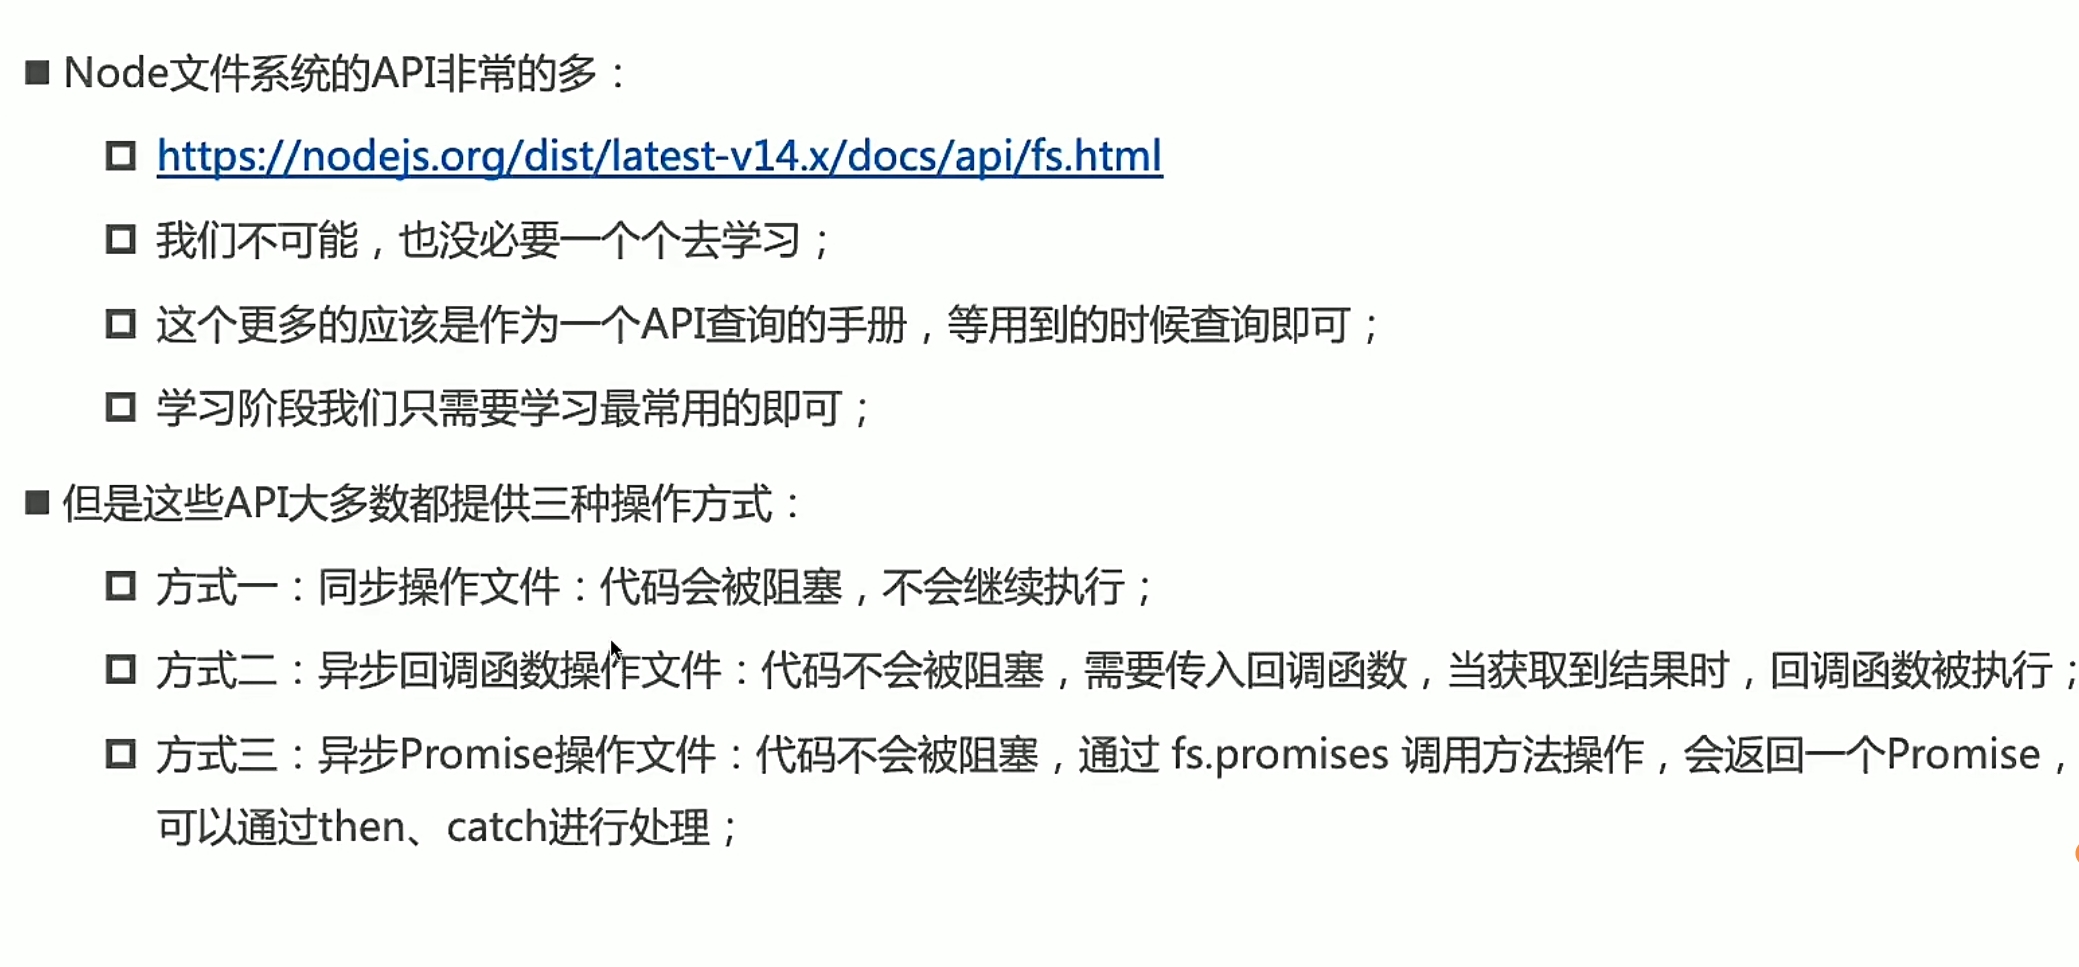
# demo 案例
const fs = require('fs'); | |
const filepath ="./app.js" | |
//1. 同步操作 | |
// const info = fs.statSync(filepath); | |
//console.log ("后续需要执行的代码"); | |
// console.log(info); | |
//2. 异步操作 | |
// fs.stat(filepath,(err,info) => { | |
// if(err){ | |
// console.log(err); | |
// return; | |
// } | |
// console.log(info); | |
// }) | |
//console.log ("后续需要执行的代码"); | |
//3.promise | |
fs.promises.stat(filepath,(err,info) => { | |
if(err){ | |
console.log(err); | |
return; | |
} | |
console.log(info); | |
}) | |
console.log("后续需要执行的代码"); |
# 文件描述符
const fs = require("fs") | |
fs.open("./abc.txt",(err,info)=>{ | |
if(err){ | |
console.log(err); | |
return; | |
} | |
fs.fstat(fd,(err,info)=>{ | |
console.log(info) | |
}) | |
}) |
# 文件的读写
const fs = require('fs'); | |
const content = "console.log(1)" | |
fs.writeFileSync("./demo.js",content,(err) => { | |
if(err){ | |
console.log(err); | |
} | |
}) |
# 7.events 模块
# 基础方法
const EventEmitter = require('events'); | |
const emitter = new EventEmitter(); | |
//2. 监听一个事件 | |
emitter.on("click",(args) => { | |
console.log("监听到click事件",args); | |
}) | |
//3. 发出一个事件 | |
emitter.emit("click",(args) => {}) |
# 8. 实现 CLI
- index.js
#! /user/bin/env node | |
这其实是一个shebang 他会去全局寻找node然后来执行 |
- 在 package.json 里去配置一个 bin
{ | |
"name": "cli-demo", | |
"version": "1.0.0", | |
"description": "", | |
"main": "index.js", | |
"bin":{ | |
"nirvana":"index.js" | |
}, | |
"scripts": { | |
"test": "echo \"Error: no test specified\" && exit 1" | |
}, | |
"keywords": [], | |
"author": "", | |
"license": "ISC" | |
} |
- 使用 npm link 去将 bin 里的指令与环境变量做一个链接
- 引入 commander 包,便于对参数进行添加查询(--version --help)

- 命令拓展
create.js
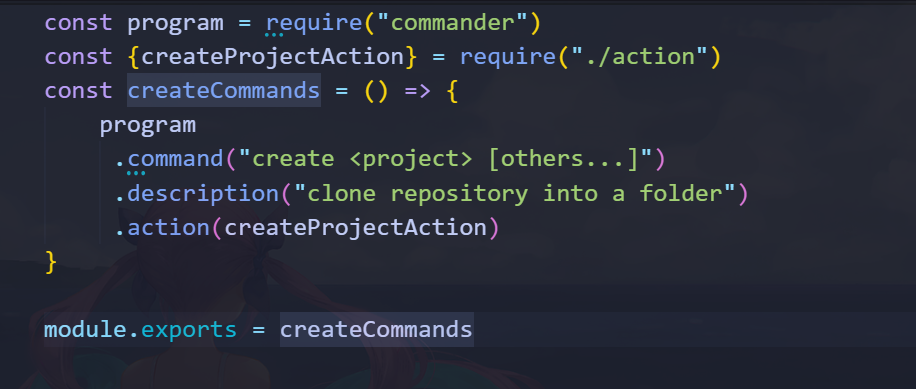
action.js
# 9.Buffer 模块
# 什么是 buffer?
Buffer 是内存区域。 JavaScript 开发者可能对这个概念并不熟悉,比每天与内存交互的 C、C++ 或 Go 开发者(或使用系统编程语言的任何程序员)要少得多。
它表示在 V8 JavaScript 引擎外部分配的固定大小的内存块(无法调整大小)。
可以将 buffer 视为整数数组,每个整数代表一个数据字节。
它由 Node.js Buffer 类实现。
# 为什么需要 buffer?
Buffer 被引入用以帮助开发者处理二进制数据,在此生态系统中传统上只处理字符串而不是二进制数据。
Buffer 与流紧密相连。 当流处理器接收数据的速度快于其消化的速度时,则会将数据放入 buffer 中。
一个简单的场景是:当观看 YouTube 视频时,红线超过了观看点:即下载数据的速度比查看数据的速度快,且浏览器会对数据进行缓冲。
# 如何创建 buffer
使用 Buffer.from()、Buffer.alloc() 和 Buffer.allocUnsafe() 方法可以创建 buffer。
const buf = Buffer.from('Hey!') |
Buffer.from(array)
[Buffer.from(arrayBuffer, byteOffset[, length]])
Buffer.from(buffer)
[Buffer.from(string, encoding])
也可以只初始化 buffer(传入大小)。 以下会创建一个 1KB 的 buffer:
const buf = Buffer.alloc(1024) | |
// 或 | |
const buf = Buffer.allocUnsafe(1024) |
虽然 alloc 和 allocUnsafe 均分配指定大小的 Buffer(以字节为单位),但是 alloc 创建的 Buffer 会被使用零进行初始化,而 allocUnsafe 创建的 Buffer 不会被初始化。 这意味着,尽管 allocUnsafe 比 alloc 要快得多,但是分配的内存片段可能包含可能敏感的旧数据。
当 Buffer 内存被读取时,如果内存中存在较旧的数据,则可以被访问或泄漏。 这就是真正使 allocUnsafe 不安全的原因,在使用它时必须格外小心。
# 使用 buffer
# 访问 buffer 的内容
Buffer(字节数组)可以像数组一样被访问:
const buf = Buffer.from('Hey!') | |
console.log(buf[0]) //72 | |
console.log(buf[1]) //101 | |
console.log(buf[2]) //121 |
这些数字是 Unicode 码,用于标识 buffer 位置中的字符(H => 72、e => 101、y => 121)。
可以使用 toString () 方法打印 buffer 的全部内容:
console.log(buf.toString()) |
注意,如果使用数字(设置其大小)初始化 buffer,则可以访问到包含随机数据的已预初始化的内存(而不是空的 buffer)!
# 获取 buffer 的长度
使用 length 属性:
const buf = Buffer.from('Hey!') | |
console.log(buf.length) |
# 迭代 buffer 的内容
const buf = Buffer.from('Hey!') | |
for (const item of buf) { | |
console.log(item) //72 101 121 33 | |
} |
# 更改 buffer 的内容
可以使用 write () 方法将整个数据字符串写入 buffer:
const buf = Buffer.alloc(4) | |
buf.write('Hey!') |
就像可以使用数组语法访问 buffer 一样,你也可以使用相同的方式设置 buffer 的内容:
const buf = Buffer.from('Hey!') | |
buf[1] = 111 //o | |
console.log(buf.toString()) //Hoy! |
# 复制 buffer
使用 copy () 方法可以复制 buffer:
const buf = Buffer.from('Hey!') | |
let bufcopy = Buffer.alloc(4) // 分配 4 个字节。 | |
buf.copy(bufcopy) |
默认情况下,会复制整个 buffer。 另外的 3 个参数可以定义开始位置、结束位置、以及新的 buffer 长度:
const buf = Buffer.from('Hey!') | |
let bufcopy = Buffer.alloc(2) // 分配 2 个字节。 | |
buf.copy(bufcopy, 0, 0, 2) | |
bufcopy.toString() //'He' |
# 切片 buffer
如果要创建 buffer 的局部视图,则可以创建切片。 切片不是副本:原始 buffer 仍然是真正的来源。 如果那改变了,则切片也会改变。
使用 slice () 方法创建它。 第一个参数是起始位置,可以指定第二个参数作为结束位置:
const buf = Buffer.from('Hey!') | |
buf.slice(0).toString() //Hey! | |
const slice = buf.slice(0, 2) | |
console.log(slice.toString()) //He | |
buf[1] = 111 //o | |
console.log(slice.toString()) //Ho |
# 10. 事件循环
这里的话就不过多解释啦,大家可以自行去看执行栈和事件循环(包括宏任务和微任务)
# 阻塞 IO 和非阻塞 IO
做个简单的比喻:进程 = 火车,线程 = 车厢
线程在进程下行进(单纯的车厢无法运行)
一个进程可以包含多个线程(一辆火车可以有多个车厢)
不同进程间数据很难共享(一辆火车上的乘客很难换到另外一辆火车,比如站点换乘)
同一进程下不同线程间数据很易共享(A 车厢换到 B 车厢很容易)
进程要比线程消耗更多的计算机资源(采用多列火车相比多个车厢更耗资源)
进程间不会相互影响,一个线程挂掉将导致整个进程挂掉(一列火车不会影响到另外一列火车,但是如果一列火车上中间的一节车厢着火了,将影响到所有车厢)
进程可以拓展到多机,进程最多适合多核(不同火车可以开在多个轨道上,同一火车的车厢不能在行进的不同的轨道上)
进程使用的内存地址可以上锁,即一个线程使用某些共享内存时,其他线程必须等它结束,才能使用这一块内存。(比如火车上的洗手间)-"互斥锁"
进程使用的内存地址可以限定使用量(比如火车上的餐厅,最多只允许多少人进入,如果满了需要在门口等,等有人出来了才能进去)-“信号量”

# 11.Http 模块
# Web 服务器
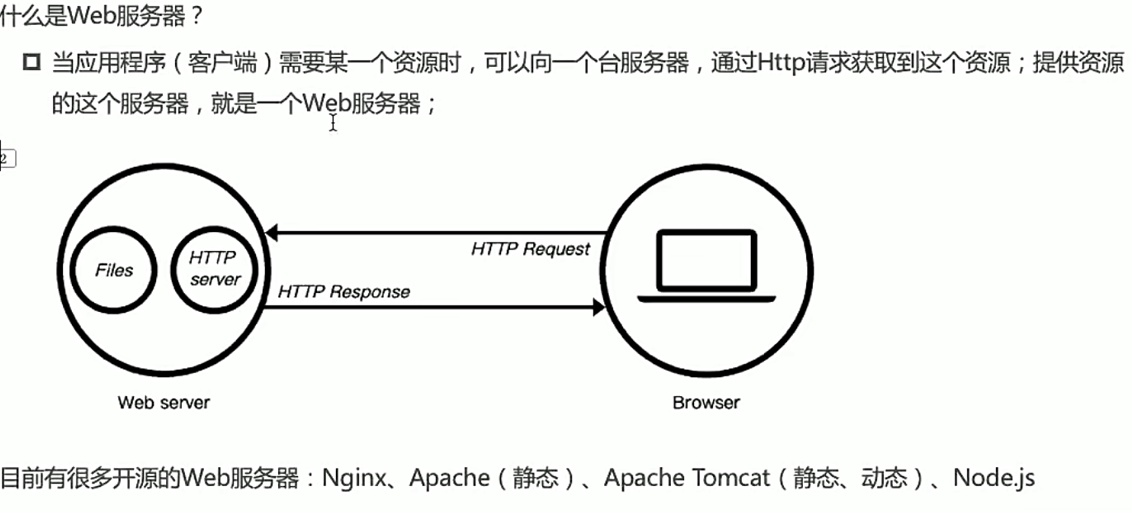
# web 服务器初体验
const http =require('http'); | |
// 创建一个 web 服务器 | |
const server = http.createServer((req,res) => { | |
res.end("hello world") | |
}) | |
// 启动服务器,并且制定端口号和主机 | |
server.listen(8000,'localhost',()=>{ | |
console.log('服务器启动成功~'); | |
}); |

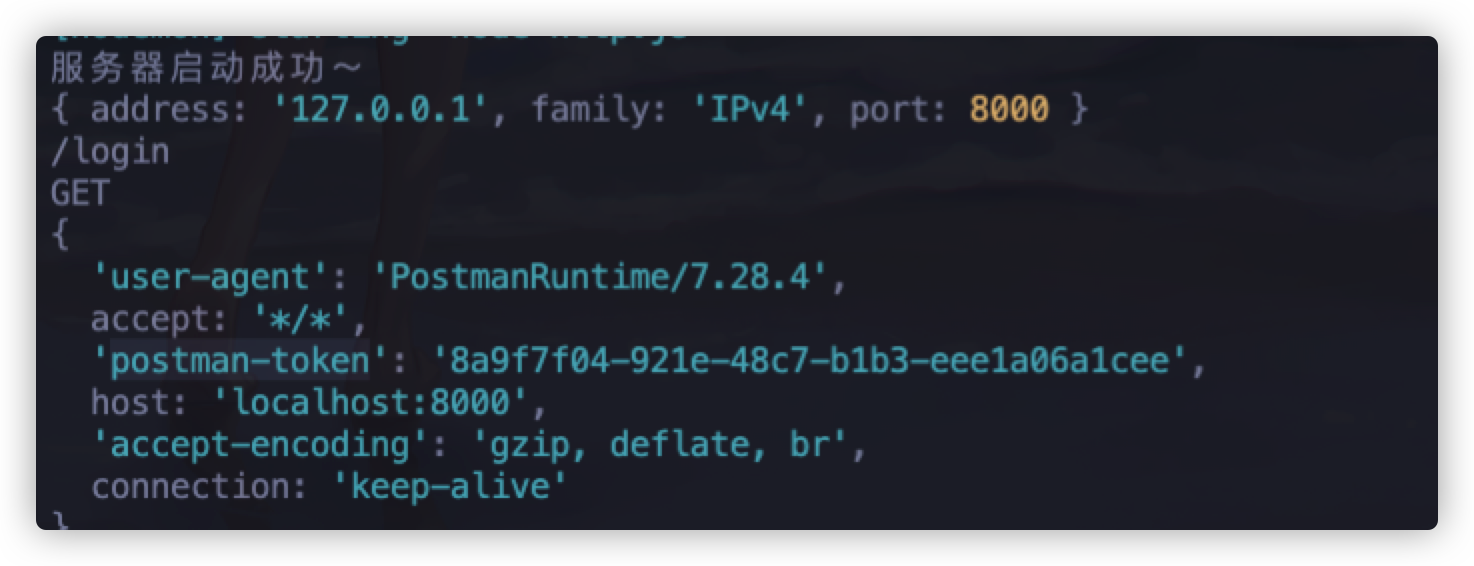
# 基于 request 的基本使用
const http =require('http'); | |
// 创建一个 web 服务器 | |
const server = http.createServer((req,res) => { | |
//requset 对象中封装了客户段给我们服务器传过来的所有信息 | |
console.log(req.url);// 请求路径 | |
console.log(req.method);// 请求方式 | |
console.log(req.headers);// 请求头 | |
res.end("hello world") | |
}) | |
// 启动服务器,并且制定端口号和主机 | |
server.listen(8000,'localhost',()=>{ | |
console.log('服务器启动成功~'); | |
console.log(server.address()); | |
}); |
# url 模块的使用
const http =require('http'); | |
const url = require('url'); | |
const querystring = require('querystring')a | |
// 创建一个 web 服务器 | |
const server = http.createServer((req,res) => { | |
const {pathname,query} = url.parse(req.url) | |
// res.end("hello world") | |
if(pathname === "/login"){ | |
console.log(query); | |
const {username,password} = querystring.parse(query)// 这是一个对象 | |
res.end("欢迎回来~") | |
} | |
// 基本使用方式 | |
// if(req.url === '/login'){ | |
// res.end ("欢迎回来~") | |
// }else if(req.url === '/users'){ | |
// res.end ("用户列表~") | |
// }else{ | |
// res.end ("错误请求,请检查~") | |
// } | |
}) | |
// 启动服务器,并且制定端口号和主机 | |
server.listen(8001,'localhost',()=>{ | |
console.log('服务器启动成功~'); | |
console.log(server.address()); | |
}); |
# method 的使用
const http =require('http'); | |
const url = require('url'); | |
const querystring = require('querystring') | |
// 创建一个 web 服务器 | |
const server = http.createServer((req,res) => { | |
const {pathname} = url.parse(req.url); | |
if(pathname === "/login"){ | |
console.log(res.method); | |
if(req.method === 'POST'){ | |
// 拿到 body 中的数据 | |
req.setEncoding('utf8');// 设置 requset 的编码格式是 utf-8 | |
req.on('data', (data) =>{ | |
// console.log(data.toString()); | |
console.log(data); | |
const {username, password} =JSON.parse(data) | |
console.log(username,password); | |
}) | |
} | |
res.end("111") | |
} | |
}) | |
// 启动服务器,并且制定端口号和主机 | |
server.listen(8001,'localhost',()=>{ | |
console.log('服务器启动成功~'); | |
console.log(server.address()); | |
}); |
# header 属性
# 1.content-type 是这次请求携带的数据类型
application/json:表示这是一个 json 类型
text/plain:表示是文本类型
application/xml:表示是 xml 类型
multipart/form-data:表示是上传文件
# 2.content-length 是文件的大小与长度
# 3.keep-alive:
- http 是基于 TCP 协议的,但是通常在进行一次请求和响应结束后会立即中断
- 在 http1.1 中,所有连接的默认是 keep-alive 的
# 4.accept-encoding: 告知服务器,客户端支持的文件压缩格式
# 响应结果
const http =require('http'); | |
const url = require('url'); | |
const querystring = require('querystring') | |
// 创建一个 web 服务器 | |
const server = http.createServer((req,res) => { | |
// 设置响应的 header | |
// 方式一: | |
// res.setHeader('Content-Type', 'application/json'); | |
// 方式二 | |
res.writeHead(200,{ | |
'Content-Type': 'text/html' | |
}); | |
// 响应结果 | |
res.write("响应结果一"); | |
res.end("<h1>hello world</h1>") | |
}) | |
// 启动服务器,并且制定端口号和主机 | |
server.listen(8001,'localhost',()=>{ | |
console.log('服务器启动成功~'); | |
}); |
# 网络请求
const http = require('http'); | |
//GET 请求 | |
http.get("http://localhost:8000",(res)=>{ | |
res.on("data", (data)=>{ | |
console.log(data); | |
}) | |
res.on("end",()=>{ | |
console.log("获取所有结果"); | |
}) | |
}) | |
//POST 请求 | |
const req =http.request({ | |
method: "POST", | |
host: "localhost", | |
port:8000 | |
},(res)=>{ | |
res.on("data", (data)=>{ | |
console.log(data); | |
}) | |
res.on("end",()=>{ | |
console.log("获取所有结果"); | |
}) | |
}) | |
req.end("post请求finish") |
# Express 框架学习
Express 整个框架的核心就是中间件,理解了中间件一切都非常简单
# 1.Express 安装
- 自己搭建 (有时间的小伙伴可以试试)
- 通过 cli 实现
// 安装脚手架 | |
npm i -g express-generator | |
// 创建项目 | |
express express-demo | |
// 安装依赖 | |
npm i | |
// 启动项目 | |
node bin/www |
# 2.express 初体验
const express = require('express'); | |
//express 其实是一个函数 “createApplication” | |
// 返回 app | |
const app =express(); | |
app.get('/', (req, res,next) => { | |
res.end("hello,express") | |
}) | |
app.post('/', (req, res, next) => { | |
res.end("hello, post express") | |
}) | |
app.post('/login', (req, res, next) => { | |
res.end("hello, login") | |
}) | |
// 开启监听 | |
app.listen(8000,() => { | |
console.log("服务器启动了") | |
}) |
# 3. 认识中间件

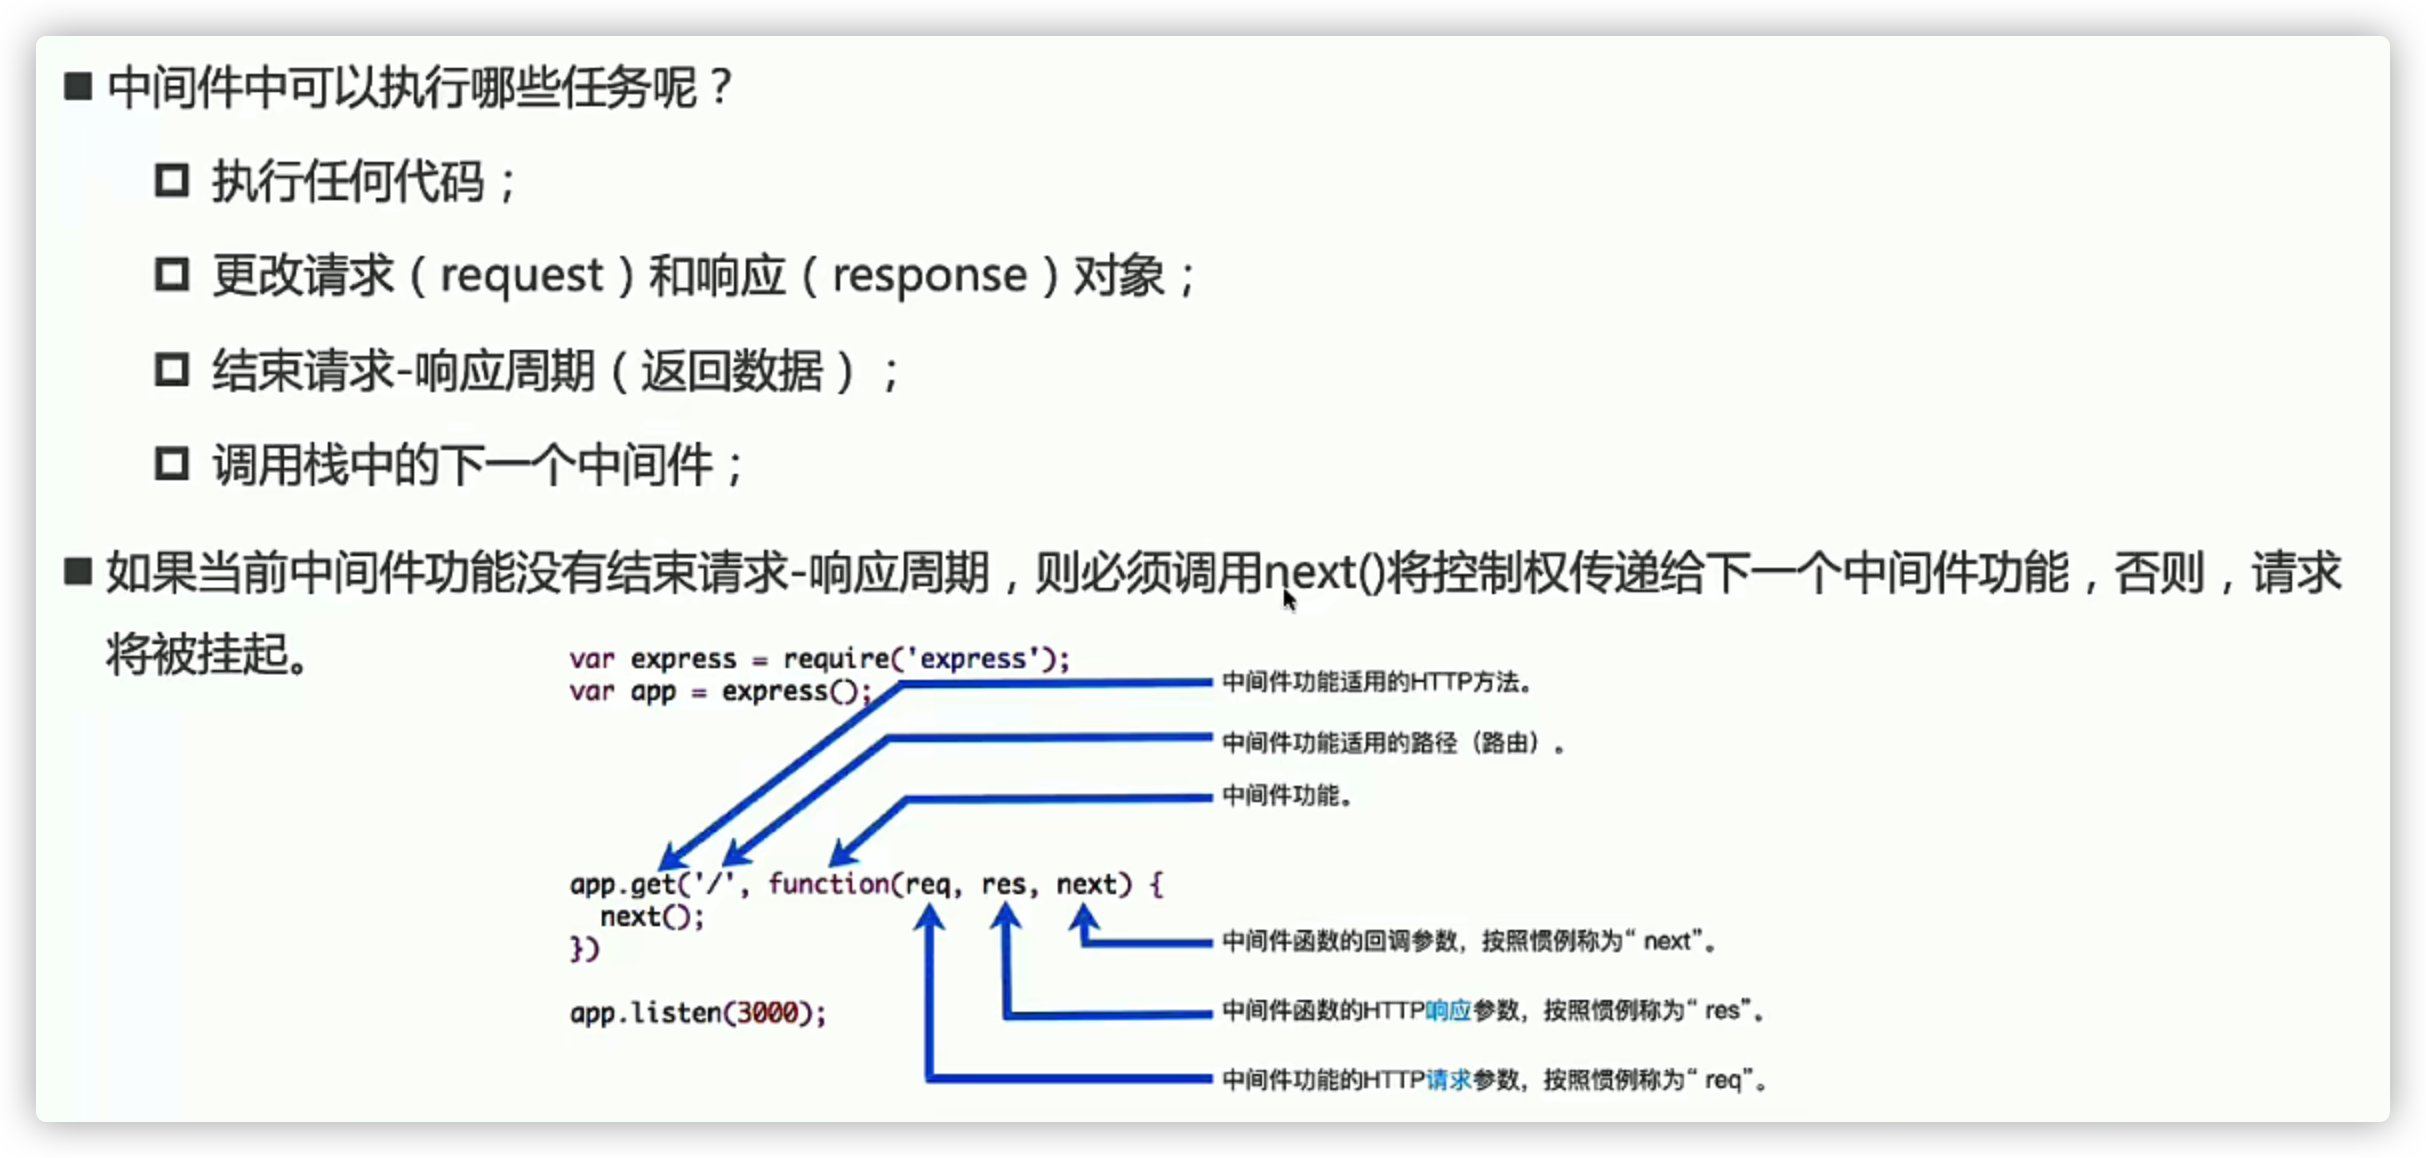
# 4. 中间件的应用
一般来说由我们自己来编写
- express 主要提供了两种方式:app/router.use 和 app/router.methods